I’ve always been a fan of the Gran Turismo series of games, and in the last year or two have been playing around with running these games in an emulated environment on PC. The classic PS1 games run flawlessly in the DuckStation emulator, and the PS2-era games work well in the PCSX2 emulator. In general, the games run just as they would on a real console, but sometimes for the true nostalgic experience you may prefer to opt for the real hardware. The real consoles also do not suffer from the latency issues that are unfortunately inherently present in modern PC operating systems.
There are many advantages to running these games in an emulator. The resolution of the games can be adjusted (if you’re into that sort of thing), you are able to create virtual memory cards, manage your saves in bizarre ways, and you are free to abuse the concept of “save states” if you so please. One advantage of using an emulator, of which there is no practical analogue on real console hardware, is the ability to remap the controller’s buttons and axes to essentially whichever you desire. This is especially useful for these old racing games like Gran Turismo, particularly when one wishes to have analog accelerator and brake inputs, which will be the primary focus of this (perhaps somewhat esoteric) article.
The Goal
Our goal is to remap the controller in such a way that will allow for easy modulation of the accelerator and brake inputs in the game. Generally, racing games that came out from the PS3-era onwards would usually use the left and right analog trigger buttons (L2 and R2) for the brake and accelerator respectively, as this is a fairly modest scheme and is very easy to operate and learn (in contrast to e.g. using an analog stick for the accelerator/brake, which we will discuss further shortly), and additionally is likely quite familiar to most people; having been used in immensely popular titles such as the HD-era Grand Theft Auto games. Many players of Gran Turismo 5 and 6 on the PS3 would map their controllers in this way, and I believe that later games like GT Sport and Gran Turismo 7 offer these mappings by default.
Traditionally, the only way an analog throttle/brake could be achieved in the older PS1 games (other than using an actual wheel and pedals), was to adjust the in-game controller mapping settings to use one of the analog sticks (e.g. the up-down axis of the right stick) to be mapped to the accelerator and brake. The game is playable in this way, and there are people who have played the game like this for years and never looked back. The DualShock 2 controllers that were used on the PS2 were interesting in that the face buttons on it were pressure-sensitive; this meant that the standard Cross for accelerate, and Square for brake, worked reasonably well as the player was able to at least modulate the pressure that they would place on these buttons.
However, the DualShock 2’s pressure-sensitive face buttons turned out to be not much more than a mere quirk, as we would never see this feature again in later controllers like the DualShock 3 and Xbox gamepads.
(Correction: the original genuine DualShock 3 controllers apparently did in fact have pressure-sensitive face and directional buttons.
It is worth noting that generally most PC software/drivers would treat them all as digital buttons for simplicity’s sake, and that the later controllers, that is, the DualShock 4, would not feature pressure-sensitive face buttons as they were not utilised very well by most games).
Since these later gamepads don’t have pressure-sensitive buttons, using them to play the PS2 Gran Turismo games in an emulator means that you face the same dilemma as that of the early PS1 games—if you wish to modulate the accelerator and brake, your only option is to map the analog sticks.
One nice feature of the DualShock 3 PS3 controllers (and I believe Xbox 360 gamepads) is that their trigger buttons are in fact analog and use their own independent axis.
The problem here of course, is that DualShock 2 controllers didn’t have such an axis, and therefore PS2 games (and emulators) do not take advantage of it by default.
We can formulate a workaround to this to allow us to use this extra trigger axis for the accelerator and brake inputs in the old Gran Turismo games. The technique that will be used here will be to map the accelerator and brake to the analog sticks using the in-game input mapper, and then on top of this, apply our own custom mappings to the controller itself, externally from the game. To get an idea of this more clearly; imagine that in the game, we map the accelerator and brake to the Y-axis of the right analog stick. That is, the accelerator is pressed as the right analog stick is pushed upward, and the brake is pressed as the right-analog stick is pushed downward. By applying our own mappings externally, we can “hack” this using a mapping, so that the left analog trigger of the controller is used to control (virtually) how much the analog stick is pushed down (for brake), and the right trigger is mapped to control how much the stick is pushed up (for accelerator). In doing this we are able to use the left/right analog triggers (L2 and R2) of the controller to modulate the brake and accelerator inputs of the PS1 and PS2 games.
Achieving the External Mappings
This article is broadly catered towards Linux users because of the totally non-existent documentation of how this can be achieved easily and intuitively on these operating systems.
Presumably most people who find this article will be Windows users perhaps wondering how they can achieve these sorts of mappings. If you are on Windows, the process of achieving this is actually rather straight-forward; all that you will need is some sort of external controller mapping utility. One that I have used in the past for DualShock 3 that works perfectly is BetterDS3, however, this tool requires that you have the MotionInJoy DualShock 3 drivers installed (I strongly recommend searching for an alternative driver to this, as MotionInJoy is well-known for being basically spyware. Installing their drivers ‘offline’ via unofficial means, which is what I did, is considered to be a somewhat safe method of using their drivers if you have to). If you are using a DualShock 4 or 5, or an Xbox gamepad, you will need to do some research of your own (as I don’t own any of these controllers) to find good Windows drivers for your controller and a mapping utility.
Over on Linux, SDL is very widely-used as an input backend, and one that both the PCSX2 and DuckStation emulators can use (you should ensure that the backends in the emulators are indeed configured so, and not to something else like ‘evdev’, or else our mappings will not take effect). DualShock controller support is also available directly in the Linux kernel. If you too are a Gentoo user then you will need to build your kernel with the DualShock drivers included. Other distributions (Debian, Arch Linux, etc.) will almost always ship their kernels with this built in already for you. We will take advantage of SDL’s controller mapping ability, which, while it is somewhat difficult to understand at first (and frankly quite scary to look at), it does get the job done. The mappings I will show will be for DualShock 3 controllers. If you are not using a DualShock 3 controller, you will need to find a base mapping string for your controller to work off of, which you can often find in SDL’s public GameControllerDB list online. You can also find a default mapping for your controller by using one of the tools linked on that page, which should be able to generate a mapping string for you. Once you have a mapping for your controller, you should be able to apply the techniques described here to create your own mappings.
How SDL Controller Mapping Strings Work
Windows users who already have their controller mapping method worked out can skip this part. Linux users who don’t happen to be using the exact same DualShock 3 controller as me will have to read on to understand how to map their controller.
An example SDL controller mapping string will appear as follows:
030000004c0500006802000011810000,PS3 Controller,a:b0,b:b1,back:b8,dpdown:b14,dpleft:b15,dpright:b16,dpup:b13,guide:b10,leftshoulder:b4,leftstick:b11,lefttrigger:a2,leftx:a0,lefty:a1,rightshoulder:b5,rightstick:b12,righttrigger:a5,rightx:a3,righty:a4,start:b9,x:b3,y:b2,
This is the base mapping that I use for my DualShock 3 controller, and that I work from to remap things to what I need.
The first section (the controller’s GUID), and the “PS3 Controller” parts can be ignored for the moment.
The most important thing here is the comma-separated list of ‘key:value’ pairs, which defines how the controller is mapped.
The important thing to understand is that the ‘key’ in these pairs refers to a generalised/common button/axis input on the gamepad that will be sent to the game (with general, abstract names such as ‘leftx’, ‘righty’, which refer to the left stick X-axis and right stick Y-axis respectively).
The ‘value’ part (the a0, b1, b8, etc.) are the raw identifiers of each button/axis on the controller, as assigned by the kernel driver, and of course indicate the raw input that the abstract identifier (the ‘key’ of the pair) should derive it’s actual values from.
The abstraction layer obviously exists so that any typical controller can be configured to operate as an abstract “controller” as defined by SDL.
In other words, the layer exists to handle the peculiarities of different controller models so that through a simple mapping string they can all be treated as a single well-defined entity, as the vast majority of user software of course have no reason to care about what precise model of controller is being used—it just has to be a “controller”.
Applying the Mapping
In order to actually apply a controller mapping to our emulator; we should first ensure that the emulator is in fact using SDL as the input backend. PCSX2 seems to use SDL by default. In DuckStation we can check by going to the ‘General Settings’ and ensuring that the ‘Controller Backend’ is set to SDL.
Next, we should ensure that the emulator is not trying to do any unusual mapping of it’s own. This is because we don’t want the emulator to interfere with our externally-specified mappings, as it is much simpler if we are only mapping outside the game in one place rather than two. This is only an issue for DuckStation, as the Linux ports of PCSX2 at the time of writing do not really allow you to configure controller mappings. The reader might be asking why we wouldn’t just use the emulator’s own internal mapping facilities to achieve what we want; but at least in the case of DuckStation, the functionality of mapping the positive/negative sides of a controller axis is completely missing/broken at the time of writing; therefore we need to resort to manually mapping externally. Defining our mappings externally from the emulator (e.g. via SDL) is additionally beneficial as our mappings can actually be used across different emulators (or those that support SDL as an input backend, which is likely to be the majority of cross-platform emulators).
Once we’ve ensured that the emulator is not trying to remap anything, we need to start the emulator with the SDL_GAMECONTROLLERCONFIG environment variable set to the mapping string.
For example, to start PCSX2 with a custom SDL mapping, something along the lines of the following commands should be used:
$ SDL_GAMECONTROLLERCONFIG="<mapping string>" pcsx2
# Or alternatively:
$ export SDL_GAMECONTROLLERCONFIG="<mapping string>" && pcsx2
PCSX2 should now be started with the custom mapping in <mapping string> loaded.
You may wish to write some simple shell scripts that allow you to easily launch your emulated games with these controller mappings automatically applied.
If you provide your base mapping in the <mapping string> part of that command, then you should be able to play games as normal, as if no custom mappings are applied.
To test that the mappings are being applied at all, you can use a mapping string like the following, where every button and axis is unbound.
Using this mapping should rid you of your ability to provide any input to the game.
You likely will need to replace the GUID and ‘PS3 Controller’ components with those representative of your own controller:
030000004c0500006802000011810000,PS3 Controller,a:,b:,back:,dpdown:,dpleft:,dpright:,dpup:,guide:,leftshoulder:,leftstick:,lefttrigger:,leftx:,lefty:,rightshoulder:,rightstick:,righttrigger:,rightx:,righty:,start:,x:,y:,
An Example Mapping
The important thing to note is what buttons and axes we actually want to map. Consider the example used earlier of mapping the right stick (which should in the game be set to control the accelerator and brake) to the left/right trigger buttons. The abstract ‘key’ we want to change, is the ‘righty’ one (pronounced ‘Right Y’, not ‘Righty’!). As an example, if we modify the above mapping so that the ‘righty’ key is not mapped to any axis, like this:
righty:
then we will be unable to accelerate or brake in the game, given that the accelerator and brake controls are bound to the right analog stick’s up-down axis in the game. This is a very simple mapping that can be used to isolate the control and confirm that we are indeed mapping the correct controls.
Now, suppose that we want to map both our left and right analog trigger buttons (L2/R2) to this ‘righty’ axis, such that the left trigger conceptually pushes the imaginary stick down (the left trigger’s value maps to the right stick’s positive range), and the right trigger pushes the stick up (the right trigger’s value maps to the right stick’s negative range).
Note that in this example we assume that the ‘up’ direction of the analog stick is defined as the stick’s negative range of values, and the ‘down’ direction as the positive range.
This may seem unintuitive at first; one may assume it’d be the reverse, but this is actually the convention used in the kernel.
Readers who ate their Weet-Bix for breakfast this morning may have also already noticed that the left and right triggers are in fact defined by two distinct raw identifiers (a2 and a5), which implies that they are treated as two different axes, as we can see here in my initial standard mapping:
lefttrigger:a2,righttrigger:a5,
The kernel treats most controllers with such axes in this way because having two separate axes not only yields a larger input range and hence higher precision, but it importantly denotes the inherent independence of the two analog trigger buttons—that is, they can both be pressed simultaneously and have two different values as they are not actually associated with each other at all, and so it makes sense that they would be separate.
(I point this out as on Windows in particular there was a vexing tendency for some drivers to treat gamepad triggers as a single axis, often labelled the ‘Z’ axis, where the negative range was used for only the left trigger, the positive range for the right, and zero indicating neither being pressed, and this of course would result in all sorts of bizarre and artificial limitations).
For numerous months I was fully convinced that SDL’s controller mapping syntax was fatally flawed in that upon first glance, it certainly appeared as though one is unable to actually map a single abstract axis (‘righty’ in our case) to point to two raw trigger axes (a2, and a5) simultaneously, and thus I’d conclude with confidence that the goal mapping outlined earlier was impossible to achieve.
Thankfully, I’d turn out to be totally wrong, when I, at last, stumbled upon libsdl-org/SDL#1166 on GitHub.
The description of the linked issue provides a quoted discussion extracted verbatim from the SDL mailing list, and includes mention of some extended syntax rules that SDL’s controller mapping strings implement.
Although this is a kind of obscure documentation (at the time of writing I could not find this information anywhere else other than by explicitly searching for it in SDL’s enormous source codebase), the extended syntax rules that we are interested in can be found at the bottom of that page and outline succinctly how the positive/negative ranges of an abstract axis can be mapped separately.
With this newfound knowledge, we can finally map the positive/negative ranges of the right analog stick, ‘righty’ like so:
+righty:a2,-righty:a5
where a2 is the identifier of the left-side trigger axis on the controller, and a5 is the right-side trigger axis.
We’re not done yet however, as for this to work correctly, we must also delete all other occurrences of the a2 and a5 identifiers in the mapping string, as the raw identifiers can only be mapped to one abstract identifier for the string to be valid.
So in this case, we simply unbind the left and right trigger buttons that formerly were bound to our controller’s raw trigger button axes.
lefttrigger:,righttrigger:,+righty:a2,-righty:a5
Of course, this means that whatever the left/right trigger buttons are mapped to in the game, will become unusable (which isn’t too much of a problem for most cases). If you for whatever reason have a need for what the left/right trigger buttons are originally mapped to; your only option is to map them to something else on the controller (or restart the game without the mappings applied).
This sort of format for the mapping strings will be used for our mappings for each of the games, and Gran Turismo 1, 2, and 4 will each have very similar mappings. There is a better mapping for Gran Turismo 3 that we can create because of it’s more versatile in-game mapping system that the other games don’t have.
The following sections will describe the mappings that can be used for each of the games.
Please also remember that for each of the mappings shown, the left trigger and right trigger axes are identified as a2 and a5 respectively, which may or may not be the same for your controller.
It is good to become familiar with what identifiers correspond to what on your controller to make producing your own mappings easier.
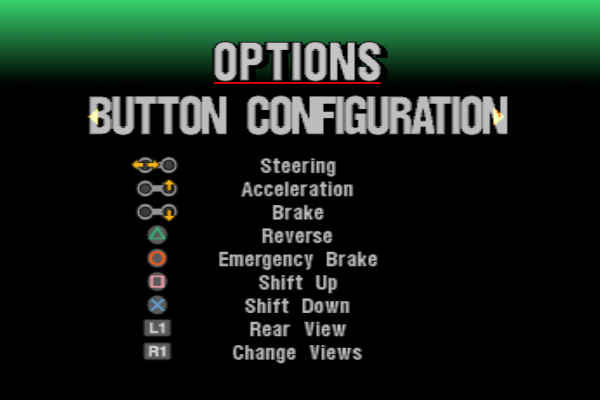
Gran Turismo 1 & 2
The first and second installments of Gran Turismo both share an identical input configuration system in-game. The following screenshots show how the controller should be configured inside of both Gran Turismo 1 and 2 in their options menus:
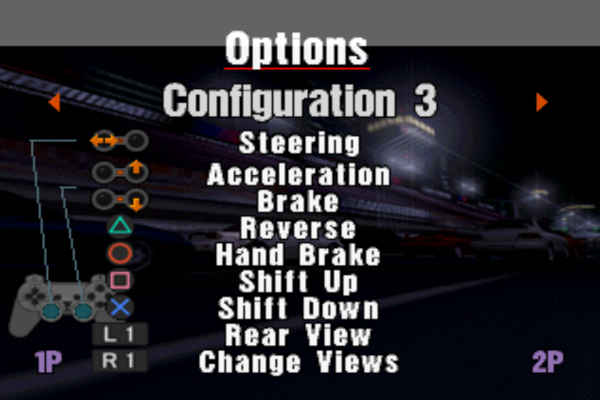
The next thing to do is formulate a mapping that takes into account the fact that our right stick now is acting as the accelerator and brake input. The mapping should map the left trigger to the downward direction (+Y) of the right analog stick (for brake), and map the right trigger to the upward direction (-Y) of the stick (for accelerator).
The modified parts of my SDL mapping is the following, where a2 and a5 are the identifiers of the L2 and R2 axes respectively:
lefttrigger:,righttrigger:,+righty:a2,-righty:a5,
And the final full mapping for Gran Turismo 1 & 2 for my controller:
030000004c0500006802000011810000,PS3 Controller,a:b0,b:b1,back:b8,dpdown:b14,dpleft:b15,dpright:b16,dpup:b13,guide:b10,leftshoulder:b4,leftstick:b11,lefttrigger:,leftx:a0,lefty:a1,rightshoulder:b5,rightstick:b12,righttrigger:,rightx:a3,+righty:a2,-righty:a5,start:b9,x:b3,y:b2,
Gran Turismo 4
Gran Turismo 4 can be mapped just as easily as 1 and 2. The only different thing here is that the game only allows us to specify the left stick for acceleration and brake, rather than the right like we used in the other games. The following screenshot shows the in-game mapping that should be used:
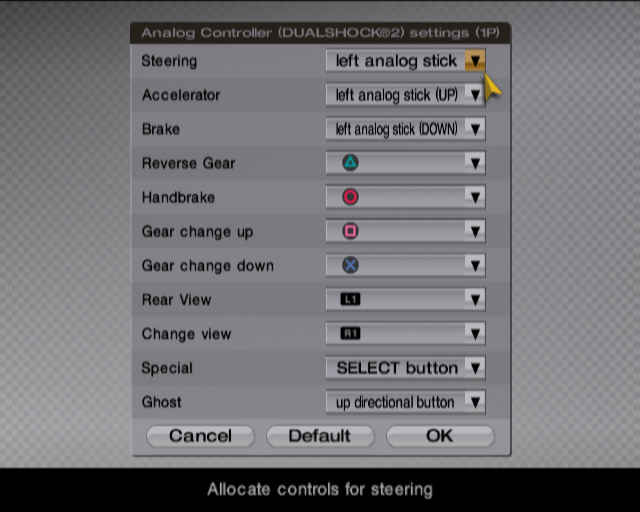 Now, we need to map the left trigger to the downward direction (+Y) of the left analog stick (for brake), and the right trigger to the upward direction (-Y) of the same analog stick (for accelerator).
The modified parts of my SDL mapping are the following:
lefttrigger:,+lefty:a2,-lefty:a5,righttrigger:,
And the final mapping for Gran Turismo 4:
030000004c0500006802000011810000,PS3 Controller,a:b0,b:b1,back:b8,dpdown:b14,dpleft:b15,dpright:b16,dpup:b13,guide:b10,leftshoulder:b4,leftstick:b11,lefttrigger:,leftx:a0,+lefty:a2,-lefty:a5,rightshoulder:b5,rightstick:b12,righttrigger:,rightx:a3,righty:a4,start:b9,x:b3,y:b2,
Gran Turismo 3: A-Spec
Gran Turismo 3 allows us more flexibility with the controller mappings; as it allows us to actually map the accelerator and brake inputs to totally seperate analog sticks and axes. We can take advantage of this, and create a mapping that allows us to press the brake and accelerator simultaneously (unlike in the other games, where the accelerator and brake are locked to the same axis).
The in-game mapping that I use is shown below:
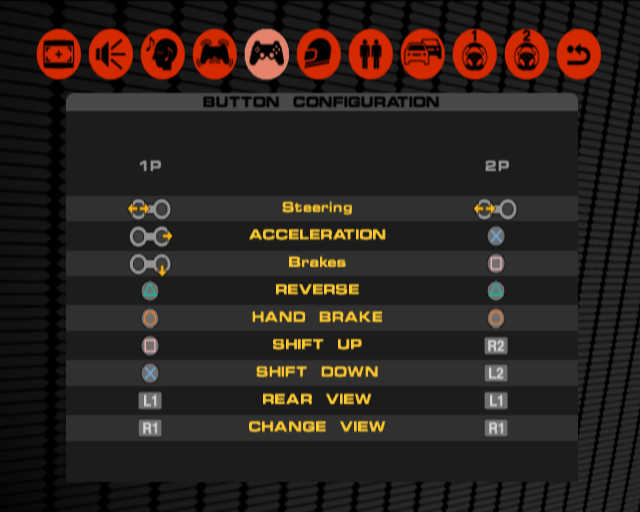
To map the controller correctly, as this configuration would be hilariously uncomfortable to play with without a custom mapping, we need to map the left trigger to the downward (+Y) direction of the right stick for braking input, and map the right trigger to the rightward direction (+X) of the right stick for accelerator input.
The modified parts of my SDL mapping are as follows:
lefttrigger:,righttrigger:,+rightx:a5,+righty:a2,
The final mapping I use for Gran Turismo 3: A-Spec, is:
030000004c0500006802000011810000,PS3 Controller,a:b0,b:b1,back:b8,dpdown:b14,dpleft:b15,dpright:b16,dpup:b13,guide:b10,leftshoulder:b4,leftstick:b11,lefttrigger:,leftx:a0,lefty:a1,rightshoulder:b5,rightstick:b12,righttrigger:,+rightx:a5,+righty:a2,start:b9,x:b3,y:b2,
Potential Issues
Because of these crazy mappings, it’s possible that some parts of the games would be unusable while these mappings are applied. For example, the Data Logger in Gran Turismo 3 allows you to use the right stick to move around; which isn’t really possible because of the wacky controller mapping that is applied. I assume that the other games would have other things that would be unusable with these mappings. If you wish to access these unusable sections of the games, the obvious way to do so is to revert back to a regular unaltered controller mapping string.